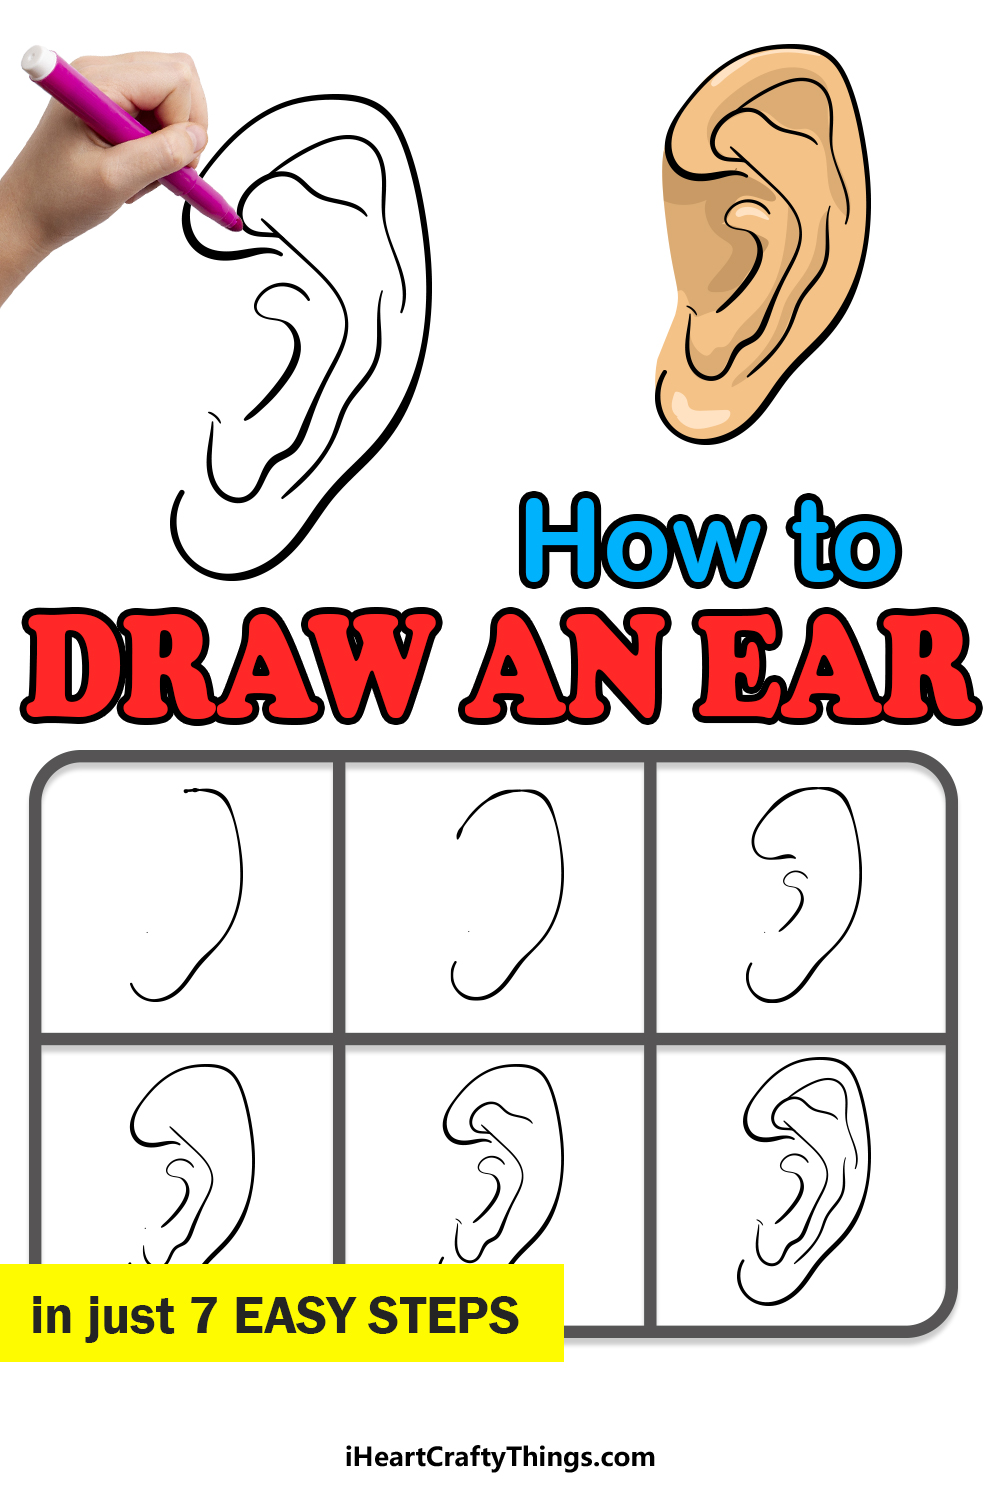
How To Draw An Ear Step By Step
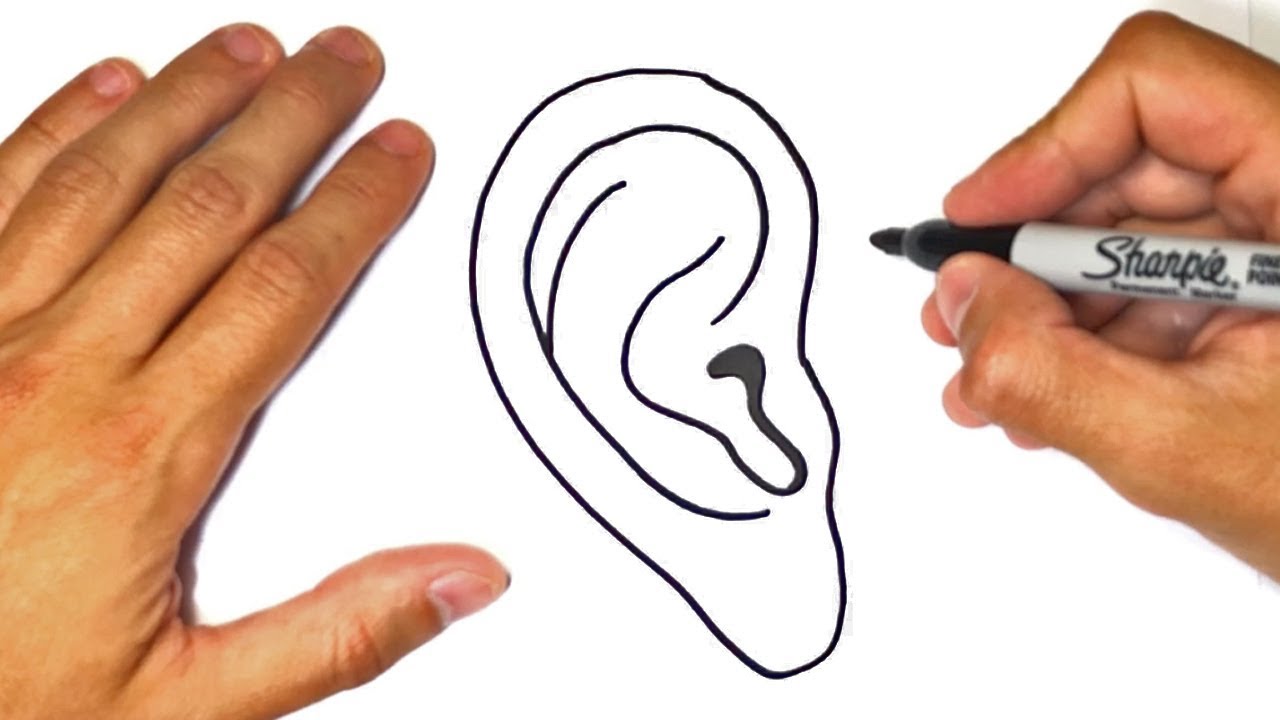
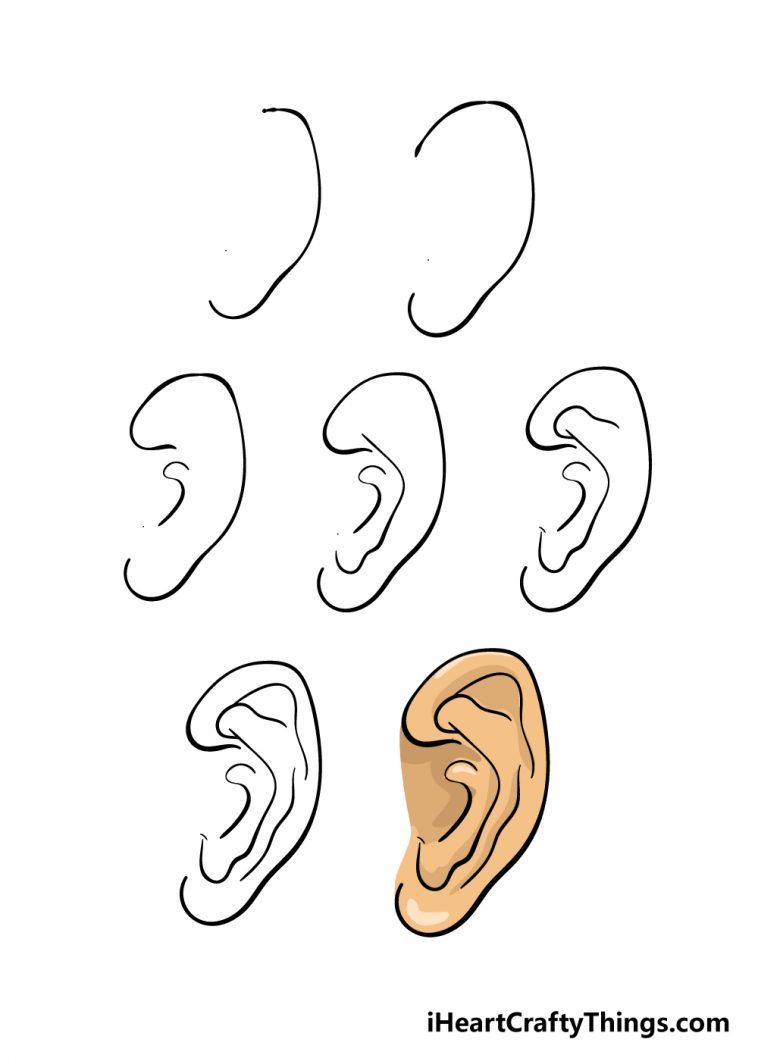
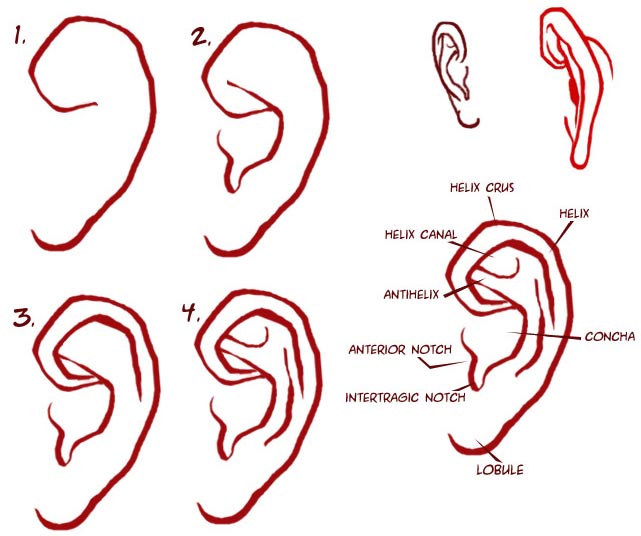
How To Draw An Ear Step By Step - These shapes serve to give the ear a basic structure. How to draw ears : However, your foundation lines will start with a more circular! When it comes to breaking down the surface anatomy of the ear, the helix is a great place to start because it allows you to define the overall contour of the ear before sketching in the remaining shapes to detail it out. Using the reference picture as a guide, we shall start by drawing a curvy vertical line. Sketch two circles, a large one and a small one. Perfect for artists of all levels. From understanding ear anatomy to avoiding common mistakes, improve your ear drawing skills with helpful tips and techniques. This helps to shape the earlobe. This will form the outer edge of the ear, and once you have it drawn we can move on to the next part! Using guidelines helps us develop a system for playing with different character designs, once you get comfortable with a more normal size ear you can easily change it just by adjusting the initial guideline. Web 1 positioning the ears in the head. Draw this wider at the top and narrower at the bottom. When it comes to breaking down the. Draw the shape of an ear. Draw this wider at the top and narrower at the bottom. Leave the outline open at the area where the ear connects to the head. Erase the guide line from the earlobe. Start by drawing the outer shape of the ear, pay attention to how the ear usually appears wider towards the top half. Using the reference picture as a guide, we shall start by drawing a curvy vertical line. Draw this wider at the top and narrower at the bottom. Basic anatomy of the ear. Web learn a simple way to draw ears in this drawing for beginners. Web ever wonder how to draw ears that look real? Draw two lines connecting the circles. The finished ear drawing will eventually be shaped like a kidney bean. Draw the shape of an ear. Then, you will learn to apply tones and finally, you will work on adding some shades that will make the painting seem more realistic. Start by drawing the outer shape of the ear, pay attention to. Firstly, you will learn to draw basic shapes and lines that will make a foundation of the ear. The finished ear drawing will eventually be shaped like a kidney bean. Using guidelines helps us develop a system for playing with different character designs, once you get comfortable with a more normal size ear you can easily change it just by. The finished ear drawing will eventually be shaped like a kidney bean. This will form the outer edge of the ear, and once you have it drawn we can move on to the next part! When it comes to breaking down the surface anatomy of the ear, the helix is a great place to start because it allows you to. Place the large circle above the small one as shown, leaving some space between them ( at least 2 inches). Outline the shape of the ear making sure the bottom part of the ear (ear lobe) is smaller in proportion to the top part of the ear (known as the helix). Follow these step by step visuals and you’ll be. Draw the shape of an ear. From understanding ear anatomy to avoiding common mistakes, improve your ear drawing skills with helpful tips and techniques. 10k views 2 years ago. Draw this wider at the top and narrower at the bottom. Then, you will learn to apply tones and finally, you will work on adding some shades that will make the. As i begin to sketch out the ear i like to begin with the helix. The finished ear drawing will eventually be shaped like a kidney bean. Leave the outline open at the area where the ear connects to the head. 10k views 2 years ago. Begin by drawing a long, curved line, resembling a backwards letter c. this outlines. Web ever wonder how to draw ears that look real? Place the large circle above the small one as shown, leaving some space between them ( at least 2 inches). Start by drawing the outer shape of the ear, pay attention to how the ear usually appears wider towards the top half and then get thinner towards the bottom. Web. Setting up guidelines for the drawing will make it much easier to develop a process that works at multiple angles. Start by drawing a tall rectangle that will be our guideline for this drawing, if you are working in pencil make sure to draw this in lightly. Erase the guide line from the earlobe. Start by drawing the outer shape of the ear, pay attention to how the ear usually appears wider towards the top half and then get thinner towards the bottom. Draw 2 curves to indicate the main folds within the. Creating the shape of your ear drawing. Leave the outline open at the area where the ear connects to the head. Using the reference picture as a guide, we shall start by drawing a curvy vertical line. For the first step in this guide on how to draw an ear, we will start fairly simple. The top is almost like the roof of a house. Gently draw an oval shape using your pencil. Web ever wonder how to draw ears that look real? As i begin to sketch out the ear i like to begin with the helix. Web learn a simple way to draw ears in this drawing for beginners. Perfect for artists of all levels. How to draw ears :
How to Draw Ears 6 Steps (with Pictures) wikiHow

Learn How to Draw Ears and How to Shade Them Drawing and Shading Ears
How to draw an Ear Step by Step Ear Drawing Lesson

How to Draw an Ear Really Easy Drawing Tutorial
Ear Drawing How To Draw An Ear Step By Step

How to Draw Ears Step by Step YouTube Drawing techniques, How to

How to Draw Ears Drawing tutorial face, Pencil art drawings, Anime
Ear Drawing How To Draw An Ear Step By Step
How to Draw Ears Step by Step Guide How to Draw
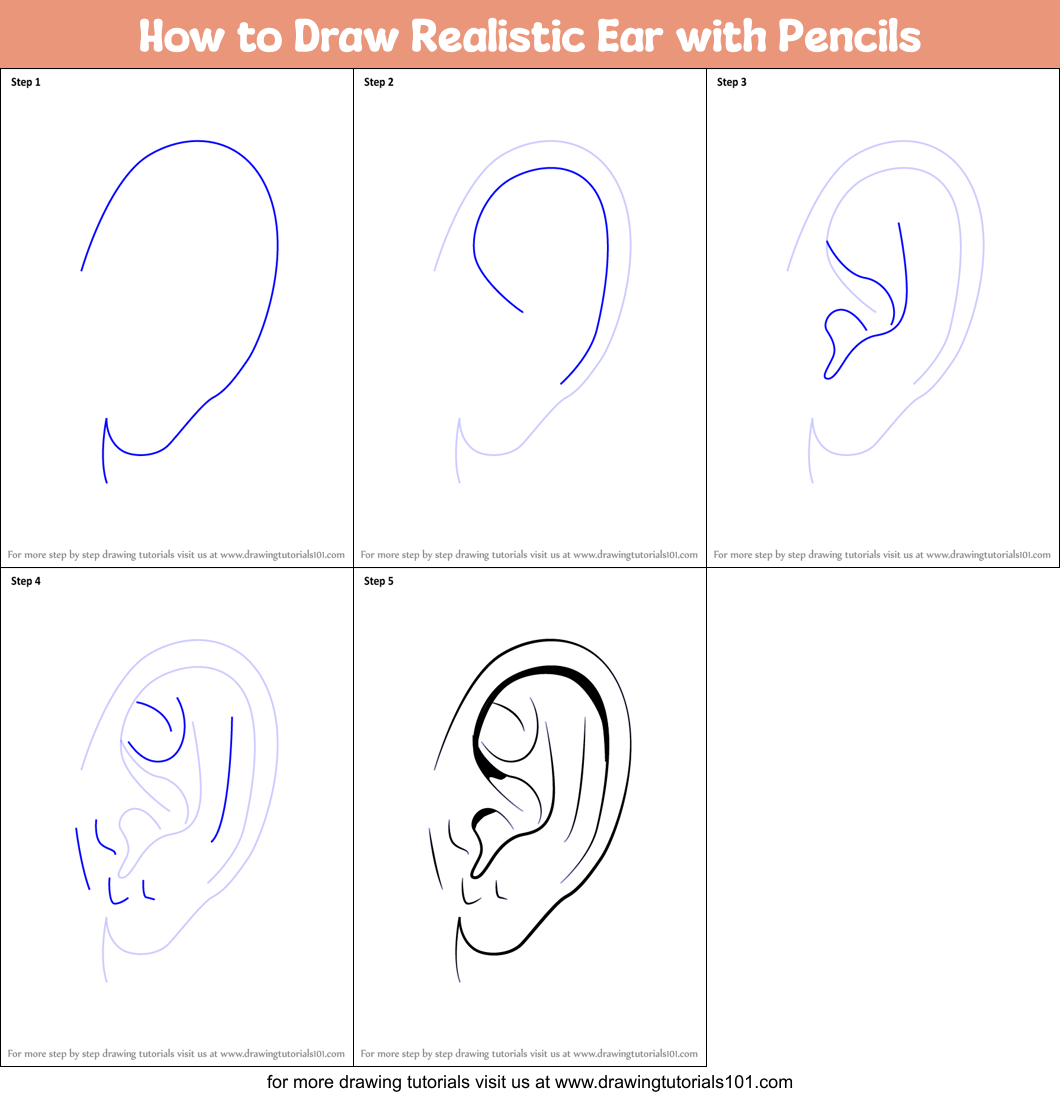
How to Draw Realistic Ear with Pencils (Ears) Step by Step
You Will Be Using This Shape As A Reference To Develop An Actual Human Ear Within Your Rough Oval Shape.
Begin By Drawing A Long, Curved Line, Resembling A Backwards Letter C. This Outlines The Shape Of The Ear.
The Finished Ear Drawing Will Eventually Be Shaped Like A Kidney Bean.
This Helps To Shape The Earlobe.
Related Post: